

How to Design Small Outdoor Kitchens: A 2026 Guide
Table of Contents
- How to Design Small Outdoor Kitchens: Start With Your Space
- Small Outdoor Kitchen Layouts That Maximize Limited Space
- Essential Small Outdoor Kitchen Appliances and Components
- Outdoor Kitchen Storage Solutions for Compact Spaces
- Budget Small Outdoor Kitchen: Planning and Prioritization
- Durable Materials and Climate-Specific Considerations
- Permitting, Utilities, and Local Building Codes
- Lighting, Shade, and Outdoor Living Ambiance
Last Updated: July 16, 2026
How to Design Small Outdoor Kitchens: Start With Your Space
Learning how to design small outdoor kitchens begins with understanding your space. Most people pick appliances first, then try to fit them in, backwards. The kitchens that work best start with a ruthless assessment of what you actually have. Before spending money on a grill or countertop, measure your space, understand your climate, and identify utility access points.
Assess Your Available Area and Constraints
Start by measuring your available footprint. Most small outdoor kitchens work within 100-200 square feet, though some function well in 50 square feet. Shape matters as much as total area, an L-shaped corner gives more functional layout options than a narrow rectangular strip.
Document where utilities exist or can reasonably reach. Gas lines, water lines, and electrical access determine what appliances you can realistically install. If you're 30 feet from your home's gas line, running a new line becomes a significant cost.
Climate is your third assessment point. Intense sun exposure makes shade structures essential. Heavy rain or salt air demands durable materials. A stainless steel grill lasting 20 years in Arizona might fail in 5 years on the Florida coast.
Choose the Right Location for Your Grill Station
Position your grill so smoke and heat don't blow into your home or seating areas. Proximity to your kitchen matters, ideally within 20-30 feet of your home's main exit to keep prep work efficient.
Consider foot traffic patterns. The grill shouldn't block natural walking routes or isolate the cook during gatherings. A slightly elevated location gives the cooking area visual prominence and intentionality.
Small Outdoor Kitchen Layouts That Maximize Limited Space
The layout you choose determines how efficiently your kitchen functions. Three proven layouts work consistently well in compact spaces.
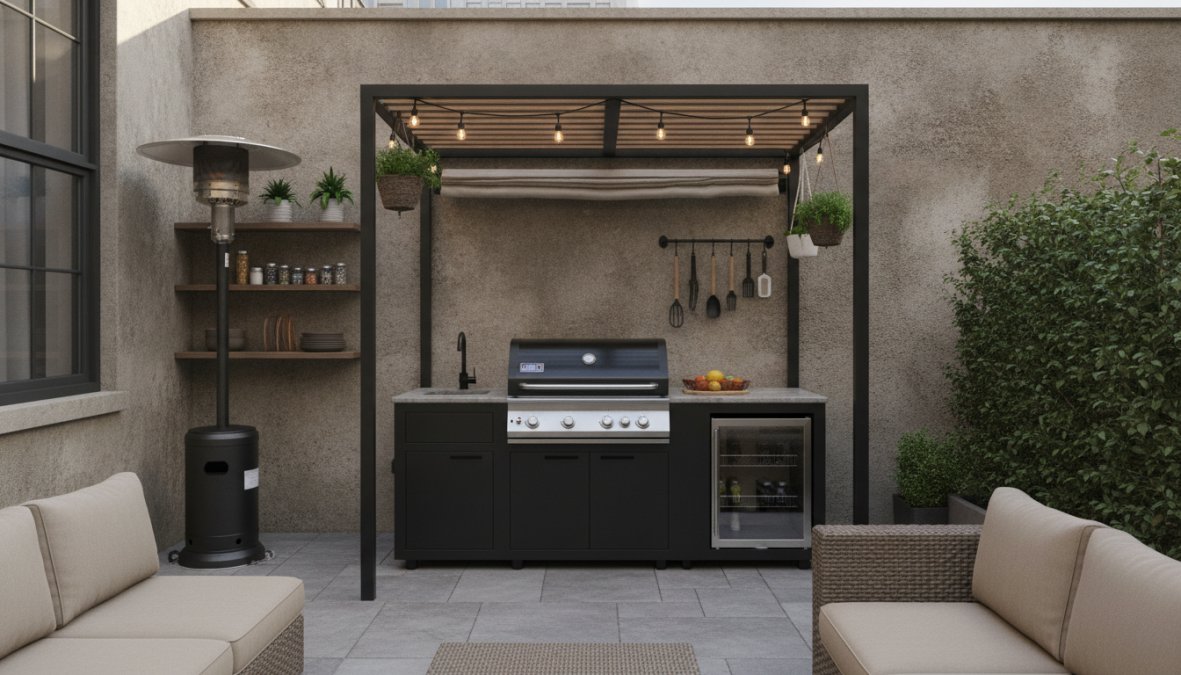
Linear Layout: Efficiency in a Single Line
A linear layout arranges your grill, prep space, and storage in a straight line. This is the most space-efficient option and works well along a fence line, beside a pool, or between your home and a property boundary.
Everything stays within arm's reach, moving smoothly from prep to cooking to plating. The trade-off is limited counter space for multiple people working simultaneously. For households cooking for 4-8 people, a well-designed linear kitchen is entirely sufficient.
L-Shaped Layout: Functional and Compact
An L-shaped layout places the grill and one counter run along one edge, then extends a second counter run perpendicular. This provides more work surface than a linear layout while fitting a modest footprint.
The L-shape naturally creates a semi-enclosed cooking zone that feels more like a traditional kitchen. It works particularly well in yard corners or against your home's corner. According to the National Association of Home Builders, L-shaped outdoor kitchens are the most popular configuration because they balance functionality with space efficiency.
Island Layout: Central Hub for Entertaining
An island kitchen sits as a freestanding element, accessible from multiple sides. This works only if you have 150-200+ square feet of open space and want the kitchen as a visual centerpiece.
Islands encourage social cooking and integrate the kitchen into your entertaining space. However, they require careful placement to avoid blocking views or traffic flow, and demand more attention to utilities since you can't rely on proximity to your home.
Essential Small Outdoor Kitchen Appliances and Components
Prioritize appliances you'll actually use regularly rather than trying to replicate a full indoor kitchen in compressed space.
The Built-In Grill: Your Core Cooking Station
The grill is your foundation. For small spaces, a 36-48 inch built-in grill strikes the right balance, large enough for gatherings, small enough to fit comfortably.
Gas grills offer consistent temperature control and faster preheat times. Charcoal grills require more space but deliver superior flavor. Look for construction matching your climate. Stainless steel (304 or 316 grade) resists rust in humid or coastal environments. For wood-burning enthusiasts in smaller spaces, consider a 25" round fire pit with grill grate, like the [25" Round Wood-Burning Fire Pit with Grill Grate, Lid & Poker, 3-in-1 Outdoor Metal Firepit](https://bnvnsf-db.myshopify.com/products/25-2-in-fire-pit-with-grill-outdoor-wood-fire-pit-with-lid-and-fire-poker-3-in-1-round-metal-firepit-with-cooking-grate), which delivers cooking functionality plus ambiance in a compact footprint.
Prep Space and Countertop Materials
You need at least 24 inches of continuous counter surface beside your grill for plating and resting food. An additional prep counter positioned away from grill heat is ideal if space allows.
For small spaces, consider composite materials like quartz or engineered stone. They offer granite's appearance with better durability and lower maintenance than natural stone.
Modular vs. Custom Cabinetry Options
Modular outdoor kitchen components offer affordability, faster installation, and reconfigurability. Custom cabinetry maximizes every inch of your specific space but costs significantly more.
For most small outdoor kitchens, a hybrid approach works best: start with a quality modular base and customize specific elements. Rooms Outdoors offers the 46" 4-Burner Outdoor Kitchen Island, Black Stainless Steel, 72,000 BTU Grill, Sink, Wine Cooler, Fridge & Granite Countertops, which provides a complete integrated solution fitting standard spaces while delivering premium functionality.
Outdoor Kitchen Storage Solutions for Compact Spaces
Without adequate storage, your cooking area becomes cluttered. Thoughtful storage design separates functional kitchens from chaotic ones.
Vertical Storage and Wall-Mounted Solutions
Build upward when floor space is limited. Wall-mounted shelving, pegboards, and magnetic strips for knives keep frequently used items accessible without consuming valuable counter or cabinet space.
Install shelving 12-18 inches above your counter work surface. Open shelving works for daily-use items you want to display. Closed cabinets are better for less-frequently used items and anything you want protected from weather.
Overhead storage racks mounted to pergolas or shade structures can hold grilling tools, hanging utensils, or small potted herbs.
Weather-Resistant Cabinets and Drawers
Outdoor cabinetry must withstand moisture, temperature swings, and UV exposure. Marine-grade plywood with stainless steel hardware resists warping and rust. Look for cabinets with proper drainage holes to prevent water accumulation.
Organize storage by frequency of use. Daily-use items go in the most accessible cabinet. Seasonal items go in less-accessible storage. Cleaning supplies go in a dedicated cabinet away from food preparation areas.
Budget Small Outdoor Kitchen: Planning and Prioritization
When you can't build everything at once, prioritize ruthlessly. The best small outdoor kitchens are often built in phases, starting with essentials and expanding as budget allows.
DIY vs. Professional Installation Cost Breakdown
A built-in grill with basic countertop and cabinetry ranges from $2,000-$5,000 for DIY installation using modular components, or $4,000-$8,000+ with professional installation. Premium integrated islands start at $4,589 and scale upward.
Gas line connections must be done by licensed professionals in most jurisdictions, this is non-negotiable for safety. Plumbing and electrical work similarly require professional licensing in most areas. The realistic DIY approach: handle assembly and countertop installation yourself, hire professionals for gas, water, and electrical connections.
Phased Build Approach: Start Small and Expand
Begin with a quality grill, basic counter space, and one cabinet for storage. This foundation costs $2,000-$3,500 and provides a functional kitchen immediately.
Phase two adds a sink and additional counter space. Phase three might add refrigeration or a second cooking surface. Phase four introduces specialty features like a pizza oven or bar seating.
This approach spreads costs over time and lets you refine your design based on actual usage patterns.
Durable Materials and Climate-Specific Considerations
Material selection determines how long your kitchen lasts and how much maintenance it requires. Plan for 10-15 years of reliable performance.
Stainless Steel and Weather-Resistant Finishes
Stainless steel dominates outdoor kitchen construction. Grade 304 stainless handles most climates adequately. Grade 316 stainless, which includes molybdenum, offers superior corrosion resistance and is essential in coastal environments.
Painted steel and powder-coated finishes are more affordable but require regular maintenance. Chips expose underlying steel to rust. In humid or coastal climates, these finishes deteriorate within 3-5 years.
For countertops, stainless steel is durable but shows fingerprints. Granite requires sealing and can stain. Concrete offers flexibility and durability when properly sealed. Composite materials like engineered quartz deliver durability with lower maintenance.
Maintenance Schedules for Longevity
Clean stainless steel surfaces monthly with appropriate cleaner. Seal granite and concrete countertops annually. Check gas connections seasonally for leaks using soapy water.
Cover your kitchen during the off-season if you live in a harsh climate. Inspect drawer slides, hinges, and moving parts annually. Lubricate with marine-grade lubricant to prevent rust. Replace gaskets and seals as needed, typically lasting 3-5 years.
Permitting, Utilities, and Local Building Codes
Before you break ground, understand what your local jurisdiction requires. Most jurisdictions require gas lines be installed by a licensed professional and inspected before use. Plumbing connections to your home's main water and sewer lines typically require permits and inspections.
Contact your local building department before purchasing appliances. Ask specifically about permit requirements, mandated inspections, whether you can do the work yourself, setback requirements, and whether your property's zoning allows outdoor kitchens.
Getting this wrong means paying for work twice, once to install it incorrectly, again to fix it to code.
Common Mistakes to Avoid When Designing Small Outdoor Kitchens
The most common mistake is underestimating counter space. Plan for 30-40 inches minimum; 50+ inches is better.
The second mistake is ignoring weather exposure. Selecting materials based on appearance alone, without considering your climate, leads to premature deterioration.
The third mistake is poor drainage planning. Water should flow away from your home's foundation, not toward it.
The fourth mistake is insufficient utility access. Running gas lines, water lines, and electrical circuits after construction is exponentially more expensive than planning for them during design.
Lighting, Shade, and Outdoor Living Ambiance
A small outdoor kitchen that's uncomfortable to use won't get used. Lighting and shade transform a functional space into one where you actually want to spend time.
Task Lighting for the Grill and Prep Area
You need task lighting focused on your grill and prep surfaces. Overhead pendant lights or recessed lights mounted 7-8 feet above counter height provide even illumination without creating shadows.
LED lights are essential for outdoor kitchens. They're energy-efficient, generate minimal heat, and last far longer than traditional bulbs. Warm white LEDs (2700K color temperature) create pleasant ambiance while providing adequate task lighting.
String lights or decorative fixtures add ambiance for evening entertaining but shouldn't be your only light source.
Pergolas and Shade Structures for Comfort
Sun exposure makes your kitchen uncomfortable during peak afternoon hours. A pergola or shade structure over your grill and prep area is worth the investment for usability alone.
Open-frame pergolas provide partial shade while allowing air circulation. Solid roof structures offer complete protection from sun and light rain. Consider the sun's angle seasonally, winter sun is welcome warmth, but summer sun is oppressive. A pergola with retractable shade or deciduous vines adapts to seasonal needs.
Shade structures also protect your kitchen from rain and UV damage, extending material life.
Designing a small outdoor kitchen requires balancing functionality, aesthetics, and practical constraints. The kitchens that work best start with honest assessment of your space and actual entertaining patterns. Rooms Outdoors offers premium outdoor kitchen islands and components designed for residential spaces. Their modular and custom options accommodate various sizes and configurations while maintaining durability and functionality for years of reliable use. Explore the 46" 4-Burner Outdoor Kitchen Island or Custom 304 Stainless Steel options to see how thoughtful design delivers both beauty and performance.
| Design Phase | Key Focus | Budget Range | Timeline |
|---|---|---|---|
| Phase 1: Foundation | Grill + counter + storage | $2,000-$3,500 | 2-4 weeks |
| Phase 2: Expansion | Sink + additional counter | $1,500-$2,500 | 3-6 weeks |
| Phase 3: Enhancement | Refrigeration or second surface | $1,000-$2,000 | 2-4 weeks |
| Phase 4: Specialty | Pizza oven, bar seating, or ambiance | $1,500-$5,000+ | 4-8 weeks |
According to the National Association of Home Builders' 2026 Outdoor Living Trends Report, outdoor kitchens consistently rank among the highest-ROI home improvements, with homeowners recovering 60-70% of their investment in resale value. Well-designed outdoor living spaces increase property values and enhance quality of life measurably. Planning your small outdoor kitchen with attention to layout, materials, and climate-specific durability ensures you're building an asset that works for years.
Frequently Asked Questions
What is the minimum size for an outdoor kitchen?
A functional small outdoor kitchen can work in as little as 4×6 feet, focusing on a built-in grill, minimal prep space, and compact storage. However, 6×8 feet or larger allows for a more comfortable grill station with adequate countertop materials and seating. The key is prioritizing your essential outdoor kitchen components, grill, prep surface, and storage, rather than trying to replicate a full indoor kitchen in limited space.
What are the best small outdoor kitchen layouts for tight spaces?
The three most effective small outdoor kitchen layouts are: (1) Linear, appliances in a single line along one wall, ideal for narrow patios; (2) L-shaped, grill on one side, prep and storage on the adjacent side, maximizing corner space; (3) Island, a compact kitchen island as a central hub for entertaining, works well in open backyard areas. Choose based on your available space and how you plan to use your outdoor living space.
How can I maximize storage in a small outdoor kitchen without taking up floor space?
Maximize outdoor kitchen storage solutions by installing vertical wall-mounted cabinets, open shelving above your prep area, and weather-resistant drawers under your countertop. Use the space beneath a built-in grill for storage, and consider modular kitchen units with integrated storage compartments. Stainless steel cabinets resist rust and moisture. Aim for 30-40% of your small kitchen footprint dedicated to storage to keep your outdoor living space organized and functional.
How much should I budget for a small outdoor kitchen, and what's the DIY vs. professional cost difference?
Budget small outdoor kitchen projects typically range from $2,000-$6,000 for modular setups to $5,000-$15,000+ for custom installations. DIY approaches save 30-50% on labor but require technical skill for gas lines, plumbing, and permitting. Professional installation ensures compliance with local building codes and proper utility access. Rooms Outdoors offers premium modular options starting at $4,589 for custom stainless steel islands, reducing installation complexity compared to full custom builds.
This article was written using GrandRanker