

How to Plan Outdoor Kitchen Layout: A Step-by-Step Guide
Table of Contents
- Understanding Outdoor Kitchen Layout Types
- Creating Functional Work Zones in Your Outdoor Kitchen
- Outdoor Kitchen Dimensions and Space Planning
- Selecting the Right Outdoor Kitchen Appliances
- Planning Utilities and Infrastructure for Your Layout
- Outdoor Kitchen Permits and Building Codes
- Choosing Materials and Climate Considerations
- Smart Technology and Maintenance for Outdoor Kitchens
How to Plan Outdoor Kitchen Layout: A Step-by-Step Guide
Last Updated: July 18, 2026
When designing an outdoor living space, understanding how to plan outdoor kitchen layout is one of the most critical decisions you'll make. A well-designed outdoor kitchen transforms your backyard into a functional entertainment zone, but poor planning leads to cramped workstations, inefficient traffic flow, and wasted investment. This guide walks you through the exact process from measuring your space to selecting appliances and understanding local building codes.
Understanding Outdoor Kitchen Layout Types
Your outdoor kitchen layout foundation depends on which configuration fits your space and entertaining style. The five primary outdoor kitchen layout options each offer distinct advantages.
Linear Layout positions all appliances and countertop space in a single straight line, working well for narrow side yards or when your kitchen must fit along one patio edge. Linear layouts are budget-friendly and work best for properties under 300 square feet of dedicated kitchen space.
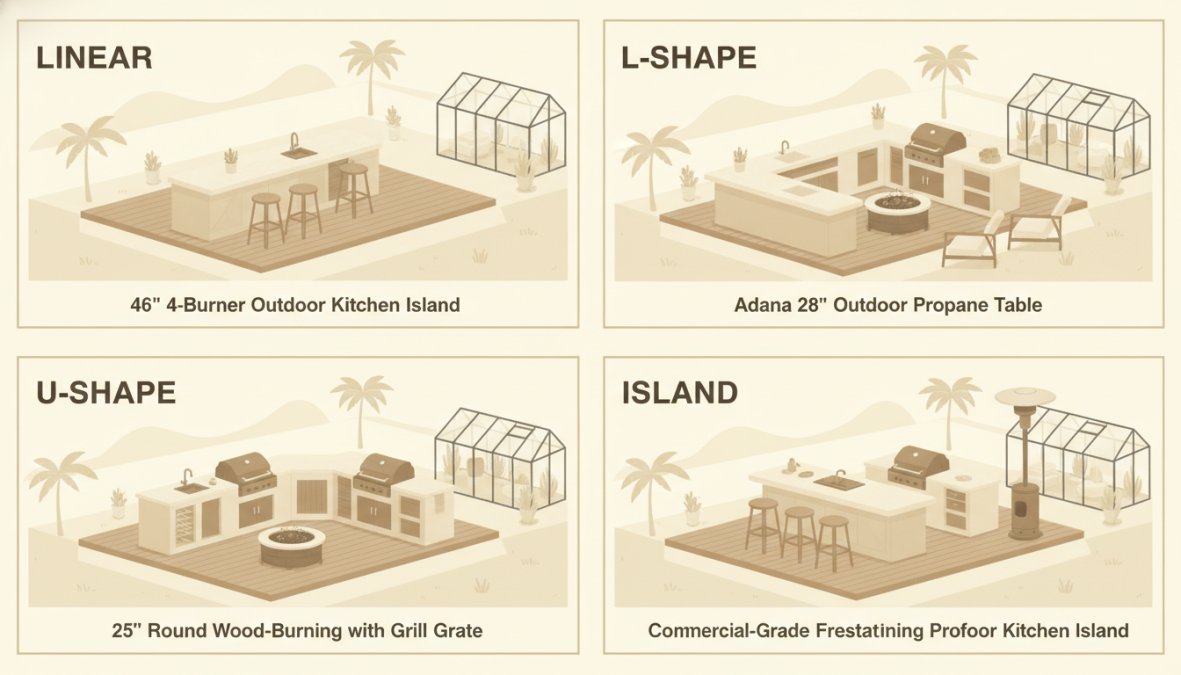
L-Shape Layout extends perpendicular from a primary wall, creating two work zones at a right angle. This configuration dramatically improves workflow by separating prep work from cooking and serving. An L-shape accommodates 400-600 square feet effectively and allows multiple people to work simultaneously.
U-Shape Layout surrounds three sides of a central space, creating the most functional workflow for serious cooks and frequent entertainers. This layout maximizes countertop real estate and creates distinct prep, cooking, and serving zones. U-shapes require at least 500 square feet of dedicated space to avoid feeling cramped.
Galley and Island Layouts represent specialized configurations. Galley kitchens position two parallel countertop runs facing each other, useful for narrow spaces. Island layouts place a central cooking structure as the focal point, with additional prep or serving counters positioned around it. Island design works best when you have 600+ square feet of open space.
Creating Functional Work Zones in Your Outdoor Kitchen
A functional outdoor kitchen layout divides into three essential work zones: prep, cooking, and serving.
Prep Zone handles food preparation, washing, and cutting. This zone needs a sink or water source, 24-36 inches of countertop space, and storage for prep tools. Position your prep zone closest to the house for convenient ingredient access. In hot climates, position away from direct sunlight to keep ingredients cooler.
Cooking Zone centers on your primary cooking appliance, typically a built-in grill. This zone needs 36-48 inches of countertop on at least one side for staging ingredients and plating finished food. Include side burners if your entertaining style requires sauces or specialized cooking. Keep this zone separate from high-traffic paths for safety.
Serving and Entertainment Zone transitions cooked food to guests and creates gathering space. This zone includes countertop space for plating, a refrigerator for cold storage, and ideally, bar seating. Position this zone as the final stop in the workflow, with food moving logically from prep through cooking to serving.
Outdoor Kitchen Dimensions and Space Planning
Getting dimensions right prevents costly mistakes and ensures your outdoor kitchen layout feels proportional to your space.
Measuring Your Available Space starts with a detailed site plan. Measure your total patio dimensions, then identify obstacles: property lines, trees, utility boxes, downspouts. Mark sun patterns throughout the day and note where utilities currently run. Sketch traffic flow paths to ensure your kitchen doesn't block natural movement from house to seating areas. Use a scale drawing on graph paper to test different configurations before committing to materials.
Countertop and Clearance Requirements follow industry standards. Countertop height should be 36 inches (standard) or 42 inches for bar-height serving. Countertop depth typically ranges from 24-30 inches. Allow at least 36 inches of clearance behind countertops for movement and appliance access. If your layout includes counter seating, allow 15 inches of knee space and 24 inches total depth from counter face to seat back.
| Space Element | Minimum Dimension | Recommended Dimension | Purpose |
|---|---|---|---|
| Countertop depth | 24 inches | 30 inches | Prep and cooking surface |
| Clearance behind counter | 36 inches | 48 inches | Movement and access |
| Counter-to-seating knee space | 15 inches | 18 inches | Comfortable dining |
| Aisle width (single person) | 36 inches | 42 inches | Safe passage |
| Aisle width (two people) | 48 inches | 60 inches | Entertaining flow |
| Grill surround clearance | 24 inches | 36 inches | Safe cooking distance |
Work Triangle Principle applies to outdoor kitchens just as indoors. The work triangle connects your three primary zones: prep (sink), cooking (grill), and serving (refrigerator). The total distance around this triangle should fall between 15-26 feet. Test this by walking the path you'll take during typical meal preparation.
Selecting the Right Outdoor Kitchen Appliances
Your appliance selection directly shapes your outdoor kitchen layout, so choose equipment before finalizing dimensions and utility runs.
Essential Appliances form the core of any functional outdoor kitchen. A built-in grill serves as the centerpiece, with sizes ranging from 24 to 42 inches wide. A refrigerator or beverage cooler keeps ingredients and drinks cold. A sink with running water enables food prep and cleanup. Side burners add versatility for sauce preparation while the grill handles protein.
Premium and Specialty Options expand entertaining possibilities. Built-in refrigerators integrate seamlessly into your layout but require electrical infrastructure. Warming drawers keep cooked food at serving temperature. Pizza ovens transform your kitchen into an entertainment focal point. Modular kitchen systems allow flexibility, letting you reconfigure your layout as needs evolve.
Planning Utilities and Infrastructure for Your Layout
Utilities determine where appliances can physically be located, so plan these early in your design process.
Water and Drainage requirements vary by appliance. A sink needs both supply lines and drainage, typically sloping toward a French drain or dry well. Many homeowners run water lines underground in conduit to protect them from freezing. Plan for a water shutoff valve accessible from outdoors so you can drain lines before winter. Some layouts include a simple hose bibb for rinsing, requiring less infrastructure than a full sink.
Gas and Electrical Lines require professional installation and permit approval. Gas lines must be installed by licensed technicians and pressure-tested before use. Electrical lines need to be buried in conduit at appropriate depths (18-24 inches) and protected by GFCI outlets near water. Calculate your total electrical load before finalizing your layout; a 20-amp circuit typically handles a refrigerator plus lighting.
Outdoor Kitchen Permits and Building Codes
Most jurisdictions require permits for permanent outdoor kitchen structures, especially those involving gas or electrical work. Contact your local building department before finalizing your design. They'll specify setback requirements, clearance requirements from structures, and any restrictions on permanent installations. Building codes also address ventilation, especially for pizza ovens or fireplaces, to prevent fire hazards.
Choosing Materials and Climate Considerations
Material selection impacts both aesthetics and longevity of your outdoor kitchen layout.
Weather-Resistant Materials must withstand temperature swings, moisture, and UV exposure. Stainless steel resists corrosion and requires minimal maintenance. Concrete countertops offer durability and modern aesthetics but require regular sealing. Granite or sintered stone provide elegant, durable surfaces resistant to staining and heat. Marine-grade plywood with stainless steel hardware resists moisture better than standard lumber.
Regional Climate Adaptations ensure your layout performs year-round. In rainy climates, prioritize drainage and materials that shed water quickly. In hot, dry climates, shade structures become essential; pergolas or retractable awnings keep prep zones cool. Cold climates demand winterization strategies: shut-off valves allow you to drain water lines before freezing, and covers protect appliances from ice and snow damage.
Smart Technology and Maintenance for Outdoor Kitchens
Modern outdoor kitchen layouts increasingly incorporate technology that enhances functionality. Outdoor lighting responds to motion sensors or time schedules. Smart thermostats control ventilation hoods or misting systems. Some premium grill models include Bluetooth connectivity for temperature monitoring. Weatherproof speakers create entertainment zones throughout your space.
Cleaning and Seasonal Care extend the life of your investment. Stainless steel appliances benefit from regular cleaning with appropriate products. Countertops should be sealed annually depending on material. In winter climates, drain water lines completely before temperatures drop below freezing. Regular maintenance prevents expensive repairs; a grill cover costs $50-$150 and extends equipment life by years.
Planning an outdoor kitchen layout requires balancing aesthetics, functionality, and practical constraints. Breaking the process into distinct phases makes decisions manageable. Whether you're designing a linear kitchen for a compact patio or a U-shaped entertaining centerpiece, thoughtful planning creates an outdoor living space built for comfort and connection.
Frequently Asked Questions
What are the most common outdoor kitchen layout types?
The most popular outdoor kitchen layouts are linear (single-line arrangement), L-shape (two perpendicular sides), U-shape (three sides with an open front), galley (two parallel counters), and island (freestanding with access from all sides). Your choice depends on available space, traffic flow, and how many people will use the kitchen simultaneously. Each layout affects work zones differently and influences the overall outdoor living space functionality.
How do I determine the right outdoor kitchen dimensions for my space?
Measure your available area and plan for at least 3-4 feet of countertop space per zone. Standard countertop depth is 24-30 inches, with 36-42 inches of clearance in front for movement. For a work triangle connecting prep, cooking, and serving areas, each leg should be 4-9 feet. In smaller spaces (under 400 square feet), consider a linear or L-shape layout. Ensure adequate traffic flow between your kitchen and house, and account for appliance door swing clearance.
What outdoor kitchen appliances are essential for my layout?
Essential appliances include a built-in grill, sink, and refrigerator, these form your core work triangle. Side burners, pizza ovens, and ice makers are popular additions that enhance functionality. Choose outdoor-rated stainless steel models for durability. When planning your layout, allocate 24-30 inches per appliance, plus workspace on either side. Consider your cooking style and entertaining frequency; a pizza oven works well in entertainment zones, while a side burner fits better in the prep area.
Do I need permits to build an outdoor kitchen, and how does this affect my layout?
Most jurisdictions require permits for outdoor kitchens, especially those with gas lines, electrical connections, or permanent structures. Permit requirements vary by location and determine setback distances from property lines, which directly impact your layout options. Check local building codes before finalizing your design, some areas restrict placement near decks or require specific clearances. Permits ensure your installation meets safety standards for utilities and drainage, preventing costly rework later.
How should I plan outdoor kitchen zoning to maximize functionality?
Create three distinct zones: prep area (near sink and storage), cooking area (grill and side burners), and serving/entertainment zone (bar seating and dining). Position zones to follow a logical workflow, prep to cooking to serving. Keep the prep zone closest to the house for easy supply access. Ensure 3-4 feet between zones for movement. In smaller spaces, overlap zones slightly; in larger areas, separate them more distinctly. Good zoning reduces congestion and improves the entertaining experience.
This article was written using GrandRanker